Showing posts with label stepbystep. Show all posts

Wednesday, 20 September 2017

Printing Trouble Shoot guide

Printing Trouble Shoot guide

 A quick and easy to follow guide to help you if you printer is not working or is not working correctly. There are many reasons your printer might not be working properly here are some of the most common issues and fixes for them. 

1. Printer Connection

The first printer issue we will talk about is the printer connection.  Check that the printer is plugged in and ready to print.  The printer usually shows a green status light when it is plugged in correctly and ready to print. 
Sometimes the cables might not be all the way inserted or the plugs may not be in sockets that are turned on so check these first if there is no light on your printer. It could also be that the cable may be old or broken. We have found with some certain printer types that the power supply can stop working correctly, and not be able to provide enough power to USB port, or allow labels to print correctly. 

If this isn't the issue check if your printer is connected to your computer (USB connected printer). does your printer show up in Apple system information. 


To check in system information you need to Hold your Alt key down while making sure you haven't clicked on anything else.  So while holding down the Alt key open the Apple menu and select system information.  Once you have clicked into system information a new dialog will open and it should look like the image below. 


Select the USB option when you have clicked into system information. Your printer should be listed in here.  If your printer is not listed in this section your computer cannot see your printer. Please try using a different USB port and refresh the list to check it is now showing. 

It may be worth trying a different port even if it shows as this sometimes helps. 


2. Local host

The second printer issue is to check the local host.  You can check CUPS errors by going to localhost:631 on a web browser.  You may need to enable CUPS by entering a command into the terminal app.  The next thing you will need to do is go to the printers section. 


If there was an error with your printer the status column would indicate this. The picture above has been annotated to show you where the status column is. 

3. Restart the printer

Try restarting your printer to fix the error. You can turn your printer off and on again to clear the buffer. 


4. Tech Support 

If you still encounter issues with your printer and none of the above actions worked, then try contacting our Peninsula Technical support team. We are here to help you with any printer issues you are having using the printers in conjunction with our software. 

Contact us via our email address at tech@peninsula-group.com

Check out our website for additional information on our products or for other ways to contacts us. 


Thursday, 14 September 2017

Sharing printers from Windows PC to Apple Mac

Accessing your Windows PC printer on a Mac

A quick and easy to follow guide on how to share your printer on PC windows so you can access it on your Apple Mac. 

The first thing you need to do once you are on your PC is to enable to the LDP print service using the steps below.

Step 1)


 Click start or the windows icon, and type Control Panel into the text box. You will see it pop up under best match, you will need to double click to open.

Step 2)


Your Control Panel will look similar to the image above. The settings we need to change are found under Programs. You will need to only double click into the Programs link and not "uninstall a program".

Step 3)


After you have clicked into programs the window will change and should now look like the above   image.  From here you will be looking for Programs and features.
Once you have located Programs and features you will want to also locate the turn windows features on or off link and double click into it. There is an annotated image below showing you where it should be located.


Step 4)


The above image shows the dialog that will open after you have clicked the "turn windows features on or off" link. From here you will need to locate the Print and document services folder.


When you have located the correct folder, you will see a small plus icon next to it. You will need to click on that icon to expand the folder. The image below shows you what will open when you click on the plus icon.


Once the files are expanded you will need to locate LDP print service and check the box so that it is turned on. once you have done that click "OK" to save it and move onto the next step.


Step 5)


The next step is to share the printer you wish to use on the network.


To begin sharing you have to click out of the windows features and control panel and go back to start or windows icon button. Type in the text box devices and printers and it should show up under best match. You will need to double click it to open.


Step 6)


After you have clicked into devices and printers a window will open showing you what Devices are shared. You need to locate the printer you wish to share.  In this example we will be sharing a Zebra printer. 


When you have located the printer you wish to share right click it to open the menu. In the menu locate printer properties and double click it. The image below is annotated to show you where it is located.


Step 7)


A new dialog will open after you click into printer properties it should look like the image above. 
The dialog will open up and be in the general tab. You need to be in the Sharing tab to share the printer, click over to it. It will be simply the next tab over from general. 


Step 8)


The above image shows what the sharing tab looks like. We need to do two things while in this tab, share the printer and give it a sharing name but this is optional. You can choose to leave the name as it is already set. Creating a new name can just help make it easier for you to find the certain printer. You will also need to remember or jot down the printer name you create for later in the installation process on the Mac.


To share the printer simply check the box next to it, so that it has a small tick inside it. The next thing you can do is type in a share name for your printer.  When you create a share name you need to ensure you use no spaces. An example shared name is Windows_Zebra_Printer. This name would be easy to remember and uses no spaces.  Then you can click apply and save.

Step 9)

Before moving over to the Apple Mac we need to find the Windows PC's IP address. 


To begin finding the Windows IP address we need to go back to main screen and yet again click on the start or windows icon button and type Control Panel into the text box. Control Panel should come up under the best match double click it to open. 


The Control Panel window will open up after you click into it, and you will need to locate the Network and internet settings. When you have located that, see there are two sub sections, click into  the firs top these sub sections. It will be called view network status and tasks. 

Step 10)


After you have clicked into view network status and tasks the window will change and the above image should show.  You will then need to locate the connections option.  We have annotated where it should be in the image below. Your connection option will either be ethernet or WiFi depending on how your Windows PC is connected. You will need to click that option.


Step 11)
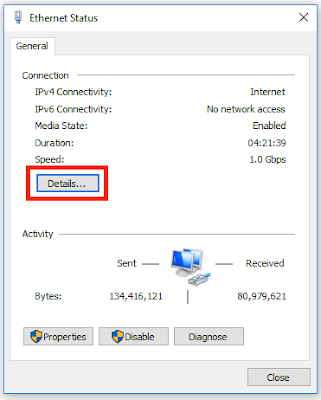


After selected on whichever connection type you are using (Ethernet or WiFi) a new dialog will open, it will look like the image above. To find your IP address click into details. Once you have clicked into details a second dialog will open up like in the image below. It will show you all the network connection details but the only one you need to know about is the IPv4 address. You will need the IPv4 address for a later step so ensure you jot it down somewhere. 


You have finished the steps that need to be done using the Windows PC now. 

Step 12)

The next step you will need to be using your Apple Mac. 
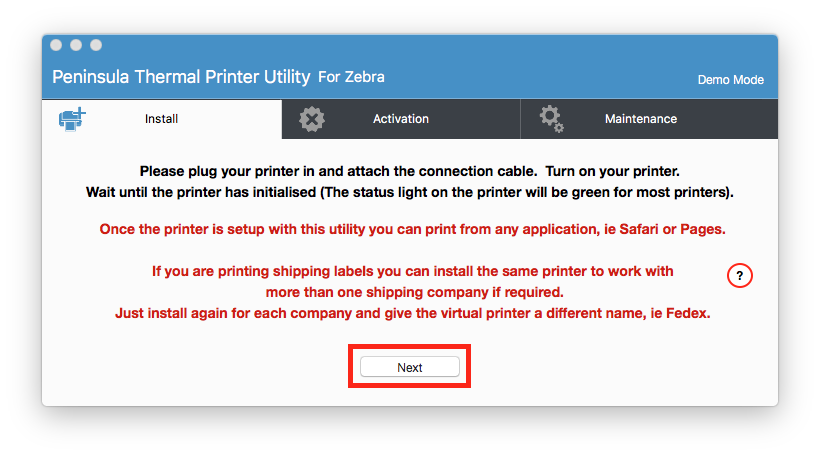
Begin by first opening the correct Peninsula Thermal utility for the printer you will be using.  Enter any admin usernames and passwords when prompted to. Click next to being installing your Printer setup. 

After clicking next you will be taken to the first step in installing, you will need to select Network connected printer from the dropdown menu and click next. 

On the next page of the setup you will be asked to choose which network connection type you will be using. You will need to select TCP-IP LPR/LPD. 

The next item to attend to on this page is entering your IPv4 address that you jotted down earlier from your Windows PC.  Ensure you enter the correct details in their correct text boxes. 

And finally the last thing on this page is to enter the shared name you gave your printer if you use done. if not you may click next without doing anything further. You should have jotted that down earlier also. Remember there were no spaces allowed. When you have entered your Printers shared name click the box to the right on the text box and uncheck it. When entering a custom shared name we don't need the Use default option checked on. 

You can continue going through the rest of the installation process now like normal. If you need help setting up a network connected printer and want to follow a tutorial we have pages for this set up on our Peninsula support page. 

If you cannot get your shared printer to work we also have a Technical support team that will help in anyway possible. Just simply email them at tech@peninsula-group.com

Peninsula webpage : https://www.peninsula-group.com

Peninsula support page : https://www.peninsula-group.com/support/


Tuesday, 23 May 2017

Need help? - Peninsula support page


Need help?

Peninsula Delivers 24hr support worldwide support with the click of a mouse. 

Here at Peninsula we have been working very hard to set up a help centre page for you, our customer. We thought in creating a support page for our customers both new and old, it would make it easier to find a quick and easy solution to the common issues our customers might have to face.


We have spent the last few weeks creating our support page, we made sure to input all our products from Barcode X Application to our Thermal printer Driver.  We have gone through all our customers' past and present issues, and so far have picked the most commonly asked questions we have received about our software. We have chosen to do an easy to understand step by step guide for the issues we have picked so far.  Because our Peninsula software products are constantly growing to cover all eventualities, but waiting for an email reply or TeamViewer link-up can be frustrating when you need a quick speedy solution. This is why we chose to set up a new free, online interactive technical support database.


We have made sure to make our support page easy to navigate via easy accesible icons, that show the particular software you may need support for. We also inputted a large search bar at the top of the web page, in which you can input keywords and easily search for the product and issue you have. The easy to use search bar and icons will give you exactly what you want and when you need it at a simple click of a button. If the issue you have is not on the page there is a link at the bottom of the page which you may click and an email dialog will open and you will be able to send an email about your issue directly to our tech team.

Once our team receive an email form you querying a issue you may have they will email back within our working day (9AM-5PM BST), and aim to sort your issue out as soon as possible so that you can get back to your own work. We understand any issues you may have may halt any progress you have with the work you are doing and aim to resolve your software issues for you as quickly and efficiently as possible. 


We made sure to set up our support web pages with a simple step by step guide, as it makes it easier to keep track of where you are in solving your issue as well as it made it able for us to input helpful images to show you what the steps should look like for you in fixing your issue. We chose to use a combination of imagery and words as images are sure to grab your attention and as they show you what you will see on the screen in front of you. If you have the same issue, you can easily read the text underneath the images and see what you have to do to resolve the issue you are having quickly and efficiently. 


Making this support website means that as our customers who may experience issues with our software you can quickly pop over to our website and find the correct guide and resolve the issue yourself quickly and get back to doing your work. This mean it will create less Tech support emails and team viewers and allow us to run as smoothly and efficiently as possible. So that we can always support you as effectively as we want to.

The support website also means that when Peninsula closes for at the usual time of 5pm customers in the rest of the world and England could be struggling into the night or the day in different time zones.   with issues they may be having with software. Customers would be losing out on Peninsula's industry leading support services, so we set up the 24 hour worldwide support website so our customers always have help where they need it.


Above is an example of what our Thermal Printer Driver support page looks like, so that you can see what type of step by step guides we have created to help you with any issues that can be fixed easily.
We will keep updating the webpage as often as we can and as the software gets updated.

So whether you are a existing customer or considering entering the world of barcodes and thermal label printing, you can be sure that the Peninsula support team will look after you every step of the way. Making it as easy and as hassle free as we can for you.

Below we have provided a link for you to be able to visit our support page yourself and see how you like it?