Showing posts with label peninsula. Show all posts

Thursday, 14 September 2017

Sharing printers from Windows PC to Apple Mac

Accessing your Windows PC printer on a Mac

A quick and easy to follow guide on how to share your printer on PC windows so you can access it on your Apple Mac. 

The first thing you need to do once you are on your PC is to enable to the LDP print service using the steps below.

Step 1)


 Click start or the windows icon, and type Control Panel into the text box. You will see it pop up under best match, you will need to double click to open.

Step 2)


Your Control Panel will look similar to the image above. The settings we need to change are found under Programs. You will need to only double click into the Programs link and not "uninstall a program".

Step 3)


After you have clicked into programs the window will change and should now look like the above   image.  From here you will be looking for Programs and features.
Once you have located Programs and features you will want to also locate the turn windows features on or off link and double click into it. There is an annotated image below showing you where it should be located.


Step 4)


The above image shows the dialog that will open after you have clicked the "turn windows features on or off" link. From here you will need to locate the Print and document services folder.


When you have located the correct folder, you will see a small plus icon next to it. You will need to click on that icon to expand the folder. The image below shows you what will open when you click on the plus icon.


Once the files are expanded you will need to locate LDP print service and check the box so that it is turned on. once you have done that click "OK" to save it and move onto the next step.


Step 5)


The next step is to share the printer you wish to use on the network.


To begin sharing you have to click out of the windows features and control panel and go back to start or windows icon button. Type in the text box devices and printers and it should show up under best match. You will need to double click it to open.


Step 6)


After you have clicked into devices and printers a window will open showing you what Devices are shared. You need to locate the printer you wish to share.  In this example we will be sharing a Zebra printer. 


When you have located the printer you wish to share right click it to open the menu. In the menu locate printer properties and double click it. The image below is annotated to show you where it is located.


Step 7)


A new dialog will open after you click into printer properties it should look like the image above. 
The dialog will open up and be in the general tab. You need to be in the Sharing tab to share the printer, click over to it. It will be simply the next tab over from general. 


Step 8)


The above image shows what the sharing tab looks like. We need to do two things while in this tab, share the printer and give it a sharing name but this is optional. You can choose to leave the name as it is already set. Creating a new name can just help make it easier for you to find the certain printer. You will also need to remember or jot down the printer name you create for later in the installation process on the Mac.


To share the printer simply check the box next to it, so that it has a small tick inside it. The next thing you can do is type in a share name for your printer.  When you create a share name you need to ensure you use no spaces. An example shared name is Windows_Zebra_Printer. This name would be easy to remember and uses no spaces.  Then you can click apply and save.

Step 9)

Before moving over to the Apple Mac we need to find the Windows PC's IP address


To begin finding the Windows IP address we need to go back to main screen and yet again click on the start or windows icon button and type Control Panel into the text box. Control Panel should come up under the best match double click it to open. 


The Control Panel window will open up after you click into it, and you will need to locate the Network and internet settings. When you have located that, see there are two sub sections, click into  the firs top these sub sections. It will be called view network status and tasks

Step 10)


After you have clicked into view network status and tasks the window will change and the above image should show.  You will then need to locate the connections option.  We have annotated where it should be in the image below. Your connection option will either be ethernet or WiFi depending on how your Windows PC is connected. You will need to click that option.


Step 11)


After selected on whichever connection type you are using (Ethernet or WiFi) a new dialog will open, it will look like the image above. To find your IP address click into details. Once you have clicked into details a second dialog will open up like in the image below. It will show you all the network connection details but the only one you need to know about is the IPv4 address. You will need the IPv4 address for a later step so ensure you jot it down somewhere. 


You have finished the steps that need to be done using the Windows PC now. 

Step 12)

The next step you will need to be using your Apple Mac
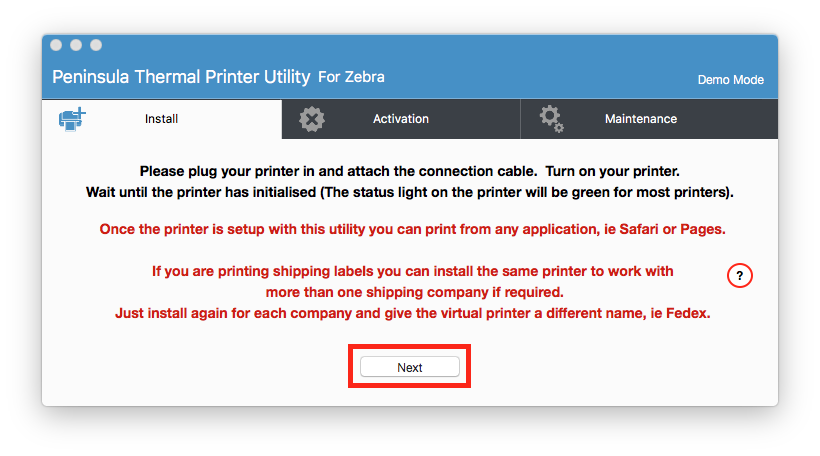
Begin by first opening the correct Peninsula Thermal utility for the printer you will be using.  Enter any admin usernames and passwords when prompted to. Click next to being installing your Printer setup. 

After clicking next you will be taken to the first step in installing, you will need to select Network connected printer from the dropdown menu and click next

On the next page of the setup you will be asked to choose which network connection type you will be using. You will need to select TCP-IP LPR/LPD

The next item to attend to on this page is entering your IPv4 address that you jotted down earlier from your Windows PC.  Ensure you enter the correct details in their correct text boxes. 

And finally the last thing on this page is to enter the shared name you gave your printer if you use done. if not you may click next without doing anything further. You should have jotted that down earlier also. Remember there were no spaces allowed. When you have entered your Printers shared name click the box to the right on the text box and uncheck it. When entering a custom shared name we don't need the Use default option checked on. 

You can continue going through the rest of the installation process now like normal. If you need help setting up a network connected printer and want to follow a tutorial we have pages for this set up on our Peninsula support page. 

If you cannot get your shared printer to work we also have a Technical support team that will help in anyway possible. Just simply email them at tech@peninsula-group.com

Peninsula webpage : https://www.peninsula-group.com

Peninsula support page : https://www.peninsula-group.com/support/


Tuesday, 20 June 2017

QuickTrack for Schools

QuickTrack for Schools


QuickTrack professional school library management software is the solution you need, that doesn't break the bank. Paying mass amounts of money for a school library software doesn't have to be the way to do things.  It does not have to break to bank to be good. Simply because it has a big price tag does not mean it will perform better or be any easier to use. 
Peninsula QuickTrack Pro for schools is a professional easy to use, complete school library system for an affordable price. Why is that? Because here at Peninsula we know schools don't have all the money in the world in their budgets for library software, we understand other things might be more important in the yearly school budget. So we made a non complicated, easy to use piece of software that is still on the same level as other library software out there, but we made it way more affordable because we know it doesn't have to break the bank. 

QuickTrack is simple and easy to use but that doesn't mean we made it cheaply it just means we made it better for you, and although QuickTrack is simple it is also powerful and professional, we didn't neglect to keep it as good as other library software out there.
QuickTrack for schools has so many amazing feautres you won't believe it all if you read them, you will want to test the software for yourself.

QuickTrack features automatic data entry and built in cataloging which is easy to use. You can begin  using QuickTrack by importing any existing book databases from other sources such as CSV and excel, for a quick and easy setup. With the automatic data entry you can simply scan the barcodes on the book and the details will be automatically entered. Our software will even retrieve an image of the book cover. This function can also obtain catalogue information for mosts CD's, DVD's and even some videos. The software is so easy to use after you simply scan the books with the provided Barcode scanner (phoenix), the built in cataloging will automatically use the internet to look up the book details and instantly enter them into QuickTrack. Our online database is always up to date and is free of charge to use, it is automatically updated when a book is published.


QuickTrack for schools is easy for students to use, and can be a great activity for your schools students to help get them involved in the library and feel like part of its operation. You could have students helping out the librarians or do a student librarian group, and students can be part of the team and learn how to use the simple, easy to use library software and gain experience.

We have made QuickTrack's library management simple and efficient by adding complete book tracking history, being able to see the borrowers current books, a simple circulation management system, a complete comprehensive student database and you can instantly show who has what. You can completely track a books history and see how many times it has been borrowed and how popular that book has or hasn't been. This can be super useful for when you are ordering new books to see what book types are the most popular or the least popular, so you can then know what to order. Once a book has been entered into the database, the book will have a complete record of where it has been over time.

We made the book in/ book out section so simple and easy to use even the youngest student can work it easily. This is our simple circulation management system. you work it by simply choosing "book in" or "book out", from the "Book in/out" menu then chose a student. You can do this using the screen or by using a barcoded ID card which the software can even print for you. You can create a complete comprehensive student database by importing them from a CSV file or you can enter each student individually by hand.  You can then see which students have which books currently. When looking to see which student has which books, you can find which student your looking for, then the students details will instantly appear and to the right of the dialog it will show which books they currently have. Then you simply scan the books barcode and its details will come up, you can then click the "book out" button to book it out, its really that easy.


The peninsula QuickTrack pro library management system comes complete with a Barcode scanner to help you set up with ease as well as being delivered on USB memory stick so you have a backup of the software. . In addition to this software you will receive the Barcode scanner via post to use in conjunction with the software. The Phoenix Barcode reader is the one we will supply you with and this requires no additional software to function, as the computer just pretends the reader is another keyboard. The reader has been designed specifically to be used to scan barcodes quickly and efficiently. The reader is also fully guaranteed for the length of the license. A free of charge replacement can also be obtained should the reader cease to function. You would simply email us and return the reader to us for a replacement. Although the reader would be very unlikely to break.

The software also offers easy to use reports. It might be that once you have been using the QuickTrack software for a while, you would need information on who has what, what is overdue and other information. QuickTrack for schools has a built in report and labelling features as standard. Which would easily allow you to collect or print out information you would require. all the reports are fully customisable and can be added to easily. A full report and a label editor is included with QuickTrack. Any popular reports you have can be stored in their own folder for easy access, enabling you to quickly get any information you need. The report data can also be saved as a CSV file or shown as a list on screen.

Email sales@peninsula-group.com to get started with QuickTrack now.
Visit our website for School library software http://librarysystems.co.uk
Or visit our Peninsula-group website https://www.peninsula-group.com/default.html

Thursday, 1 June 2017

Understanding Barcode X serial numbers


Understanding Barcode X serial numbers

Serial numbers in Barcode X can be a bit tricky to get your head around. You might open up your Barcode  X software for the first time and be completely baffled by what to do. We created a support database on our Peninsula-group website ( https://www.peninsula-group.com ) to help with some of your queries you may have about our Barcode X software, and if your questions are not answered on the support page there is an email icon at the bottom of the page where you can send our tech support any questions you may have. we recently added two new support pages in Barcode X showing you how to create a barcode from CSV files and also explaining about serial codes and what to do on the number tab (2nd one along on the top of the 2 tab rows) in Barcode X. We at Peninsula thought understanding all the boxes when your in the number tab in Barcode X might be a little confusing at first so we thought we would explain it all right here for you. 


First off we begin by opening up our Barcode X software and navigating to the number tab which as we said previously is the 2nd tab along on the top if the 2 tab rows see the image to the left. The dialog should look exactly like the image on the left. See the many different fields to fill in with words like Prefix, Suffix and Dialogs, you might not even know what those words even mean let alone what data to input into each field and drop down menu. So here in this blog post we will take each individual field and go through what data you might need to input and were you would need to look to find that out. 


To begin with we need to state that serial numbers have various components and in this post we will explain the various parts to the numbers and were to input the correct numbers into the correct fields. Please also note any code we may use to explain things to you will be an example and your code will be made up differently. 


The first field you will see on the dialog will be the Prefix box. The prefix field is for if a "JS" appears before the beginning of a serial number. If a "JS" appears before your serial number you would then input JS in the prefix field. 


The second field you will encounter on the dialog will be the start field. The start field is for if the serial numbers go from 1 to 199. So if your serial  number goes between 1 and 199 then you should enter 1 in the start field. 


The third field you will see on the dialog will be the suffix field. The suffix field is different to the prefix field in that if "AB" appears at the end of each serial number then you would enter an AB in the suffix field. 


The fourth field you will encounter on the dialog will be the end field. The end field is like the start field but instead of entering a 1 into the field, if the serial numbers go from 1 to 199 you would enter a 199 in the end field. So if your serial numbers go from 1 t0 199 enter a 199 into the end field. 


The fifth field you will see on the dialog will be the step field. This field will be for if the serial numbers of 1, 2, 3, 4, 5 for step size of 1. Or if it uses a step size of 10, it would go 10 , 20, 30, 40. So in the step field you would input the step size number that your serial numbers use, for this example we would input 1 into our step field, and this would say our serial numbers go up by one each time. 


The sixth field you will see is the data length field. The data length field sets the number of digits output as a serial number. This includes the prefix and suffix that we entered in the earlier fields. Some barcodes will not allow you to alter this length as they have fixed lengths, some barcode will let you alter the length however.  If a serial number is less than the data length, it will automatically insert leading zeros to maintain the length. 
we will give you an example. If we entered 12 in the data length field. The data together should return the first serial number as JS00000001AB . See that the number generated has 12 digits this is because we inputted the data length to be 12. As the serial number was less than the data length the zeros were inputted to make it reach the data length. 


The seventh field you will see on the dialog is the show dialogs field. The show dialogs field is for if you want to run the automatic dialogs on or off. The dialogs appear when you click on a barcode to make it. Window will pop up asking you where you want the barcode to be saved and what you want to call it. So if you have already predetermined were your barcodes will be saved you can choose to click the dialog button to stop the dialogs showing each time a barcode is generated. For example if you are generating 100 barcodes you wouldn't want 100 dialogs popping up asking you to save each individual barcode, as this would be a frustrating process. 


The eighth field you will encounter on the dialog is the Type dropdown menu. The type dropdown menu is for if your barcode is numeric or alphanumeric. Some barcodes and text items are not only numeric they can be instead alphanumeric. This means that they not only have numbers but also letters making it a combination of the alphabet and numbers. Hence the name alphanumeric.  The Type drop down menu allows you to choose whether an item in a serial number is numeric or alphanumeric. 


The ninth field you will see on the dialog is the repeat field. The repeat field is the final box on this tab page. This is only relevant when you are wishing to print serial numbers directly from within the application. The field allows you to enter a number which, when set will allow the serial number to stay for a certain number of labels. This can be particularly useful when using batch numbers. For example with batch numbers the numbers may only need to increase every 20 labels, so you would input in the field 20. Then the serial code would change every 20 times. 


If you still encounter any issues or problems with your Barcode X software please email our Technical Support at tech@peninsula-group.com .


Tuesday, 23 May 2017

Need help? - Peninsula support page


Need help?

Peninsula Delivers 24hr support worldwide support with the click of a mouse. 

Here at Peninsula we have been working very hard to set up a help centre page for you, our customer. We thought in creating a support page for our customers both new and old, it would make it easier to find a quick and easy solution to the common issues our customers might have to face.


We have spent the last few weeks creating our support page, we made sure to input all our products from Barcode X Application to our Thermal printer Driver.  We have gone through all our customers' past and present issues, and so far have picked the most commonly asked questions we have received about our software. We have chosen to do an easy to understand step by step guide for the issues we have picked so far.  Because our Peninsula software products are constantly growing to cover all eventualities, but waiting for an email reply or TeamViewer link-up can be frustrating when you need a quick speedy solution. This is why we chose to set up a new free, online interactive technical support database.


We have made sure to make our support page easy to navigate via easy accesible icons, that show the particular software you may need support for. We also inputted a large search bar at the top of the web page, in which you can input keywords and easily search for the product and issue you have. The easy to use search bar and icons will give you exactly what you want and when you need it at a simple click of a button. If the issue you have is not on the page there is a link at the bottom of the page which you may click and an email dialog will open and you will be able to send an email about your issue directly to our tech team.

Once our team receive an email form you querying a issue you may have they will email back within our working day (9AM-5PM BST), and aim to sort your issue out as soon as possible so that you can get back to your own work. We understand any issues you may have may halt any progress you have with the work you are doing and aim to resolve your software issues for you as quickly and efficiently as possible. 


We made sure to set up our support web pages with a simple step by step guide, as it makes it easier to keep track of where you are in solving your issue as well as it made it able for us to input helpful images to show you what the steps should look like for you in fixing your issue. We chose to use a combination of imagery and words as images are sure to grab your attention and as they show you what you will see on the screen in front of you. If you have the same issue, you can easily read the text underneath the images and see what you have to do to resolve the issue you are having quickly and efficiently. 


Making this support website means that as our customers who may experience issues with our software you can quickly pop over to our website and find the correct guide and resolve the issue yourself quickly and get back to doing your work. This mean it will create less Tech support emails and team viewers and allow us to run as smoothly and efficiently as possible. So that we can always support you as effectively as we want to.

The support website also means that when Peninsula closes for at the usual time of 5pm customers in the rest of the world and England could be struggling into the night or the day in different time zones.   with issues they may be having with software. Customers would be losing out on Peninsula's industry leading support services, so we set up the 24 hour worldwide support website so our customers always have help where they need it.


Above is an example of what our Thermal Printer Driver support page looks like, so that you can see what type of step by step guides we have created to help you with any issues that can be fixed easily.
We will keep updating the webpage as often as we can and as the software gets updated.

So whether you are a existing customer or considering entering the world of barcodes and thermal label printing, you can be sure that the Peninsula support team will look after you every step of the way. Making it as easy and as hassle free as we can for you.

Below we have provided a link for you to be able to visit our support page yourself and see how you like it?