Setting up a USB connected Zebra label printer on Mac
Below you will find a quick easy setup guide on how to setup a Zebra label printer that is USB connected on your Mac. You will need to have the Peninsula Zebra Thermal Utility installed and activated.
To download the Zebra Thermal Utility Driver, go to the website linked below. You will be taken directly to the Thermal driver webpage and can find a download link there for a demo or to purchase the full Thermal Driver.
https://www.peninsula-group.com/mac-thermal-printer-driver/
To download the Zebra Thermal Utility Driver, go to the website linked below. You will be taken directly to the Thermal driver webpage and can find a download link there for a demo or to purchase the full Thermal Driver.
https://www.peninsula-group.com/mac-thermal-printer-driver/
Step 1 - Installing the Printer
A)

First of all switch your Zebra label printer on and make sure the green status light is showing, then you can start the installation process.
Begin by opening up the Zebra Thermal Printer Driver software. Upon opening it should look like the image above. Ensure you are in the Install tab.
To Begin the installation process simply click the "Next" Button.
B)
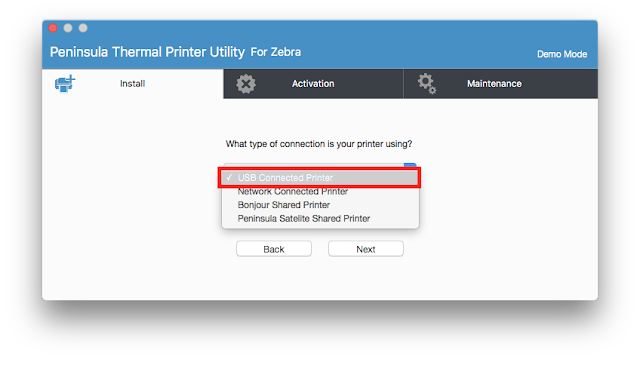
After clicking "next" the first page to show on the dialog will ask what connection your printer is using. In this setup we are showing you how to set up your USB connected Zebra label printer.
Therefore click the "USB connected printer" option from the drop down menu.
When the correct connection type is selected click "next" to continue onto the next step.
C)
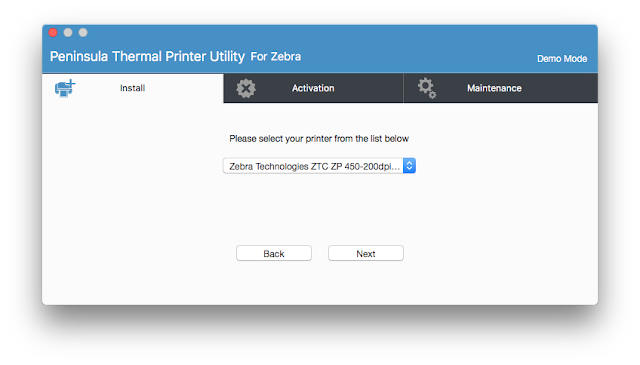
The next step is to select the printer that you are using from the drop down list. As this is a Thermal utility for Zebra label printers you should have a Zebra label printer selected. Once you have ensured you have selected the correct Zebra label printer from the list click "next" to continue onto the next step.
D)
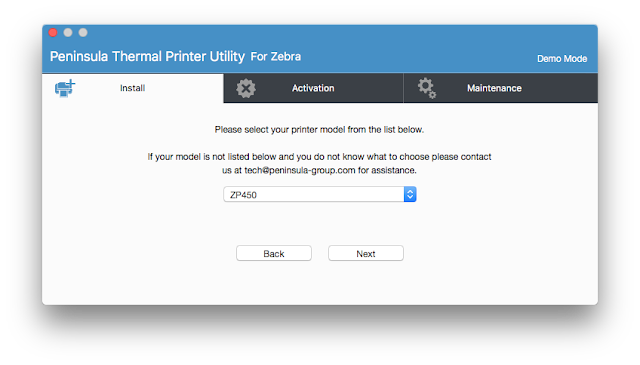
The next page will ask which printer model you are using. If you do not know which printer model you are using it will say somewhere on the printer itself, often at the front. For this example we used a ZP450 zebra label printer. Find your own printer model from the drop down list and select it. Ensure you have selected the correct model.
Then click "next" to continue.
E)
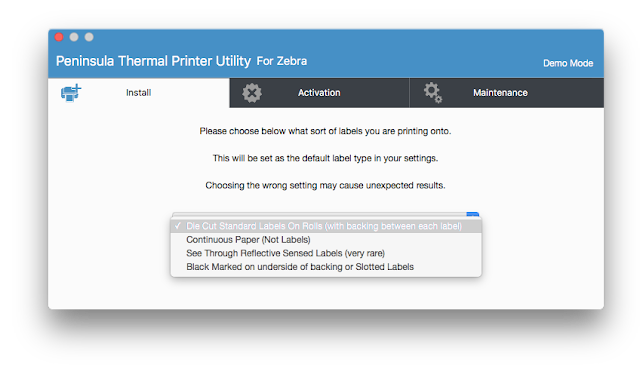
This step requires you to choose what sort of labels you will be using in your Zebra label printer. In our example we are using the Die cut standard labels, these labels are the most common labels to use in your Zebra thermal label printer. You will know what labels you use however so select the correct label and click "next" to continue.
F)
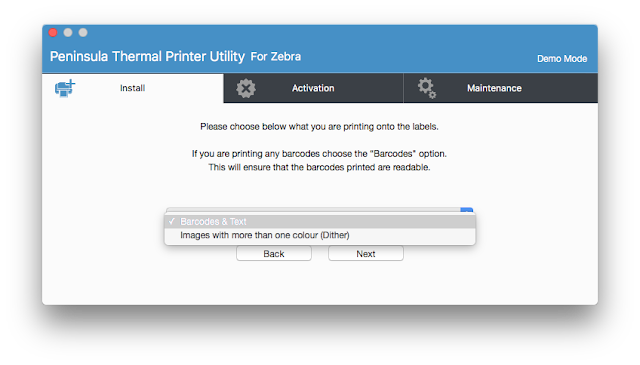
The next step asks you what you will be printing on the labels you print from your Zebra thermal label printer. Will you be printing simply barcodes and text or images with more than one colour. Most commonly you will be printing barcodes and text. In our example thats what we have selected to print from the Zebra label printer we are using. So select which option you are using and click "next" to continue.
G)
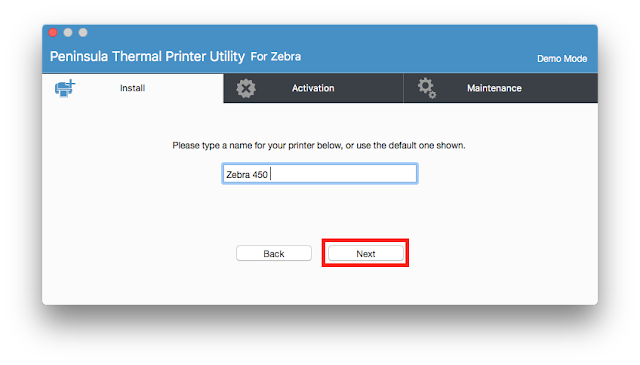
This step is asking for a name for your printer, this is so you know which printer it is and what setup you have installed it with on the thermal utility. Here we have simply named it the Zebra 450 as it is the name and model of printer we are using. You can choose to name your printer or leave it as the default name set. Remember to give your printer a sensible name but don't use any special characters. You might want to give this setup a different name as you can set up multiple virtual printer setups for different setups you may need it for. After you have typed a name or left it as default whichever you prefer, click "next" to continue.
H)
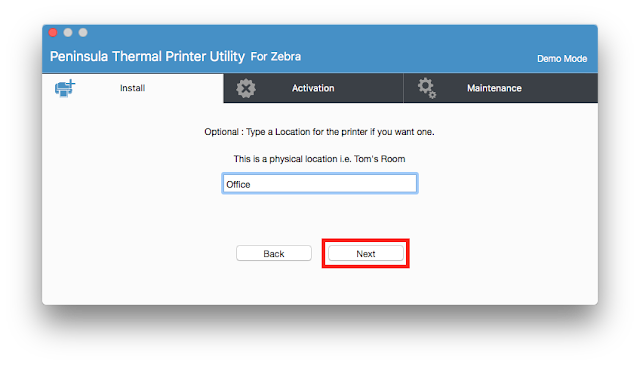
The next step is optional it is to type in a physical location for where your printer is stored for if you want one. This is an optional step and you don't need to enter a location name if you don't not wish to have one. For our example we have entered "office" as this is where we store the printer. If you choose to enter a location name ensure you enter it correctly and click "next" to continue.
I)
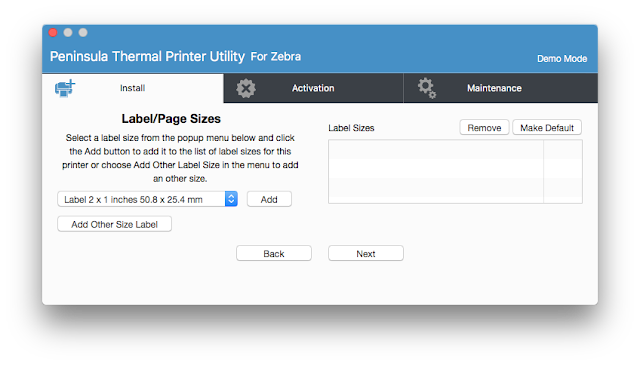
The next step is about the label/page sizes you will be using. You can add more than one size to the list, ensure you select the correct size labels that you will be using in your Zebra label printer. To add your label sizes, select which sizes you want from the list and click "add'. your label sizes should pop up in the left hand side box. the left hand size box shows which label sizes you have added.
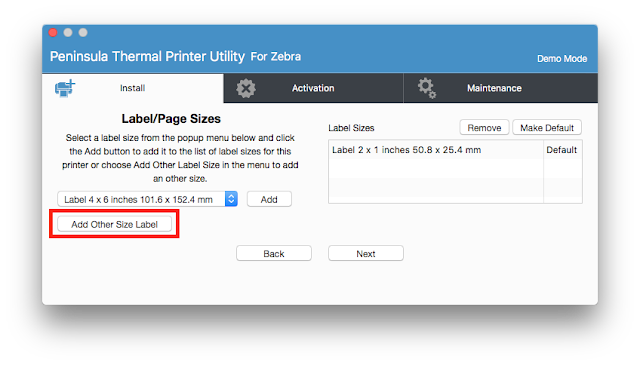
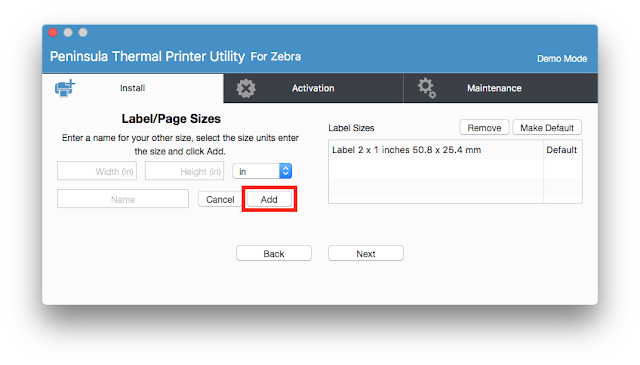
To add a custom label size for if you don't see the label size you want in the drop down menu, simply click on the "add other size label" button. From there the dialog will change. The new dialog will look like the one in the image below. There are new text boxes prompting you to enter the dimensions you have for your own label sizes. Ensure you enter the correct dimensions and click the "add" button. Then When you have ensured you have added your correct label sizes click "next" to move onto the next step.
J)
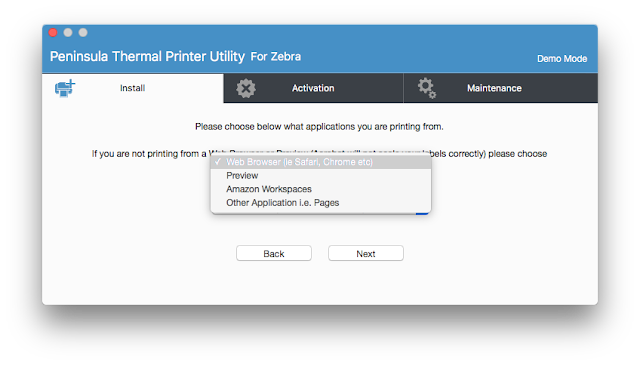
The Next step in the installation process is to pick what application you are printing from, this is important so ensure you choose correctly. You should know what application you will be printing from but ensure you click the correct option. Click "next" to continue onto the next step.
K)
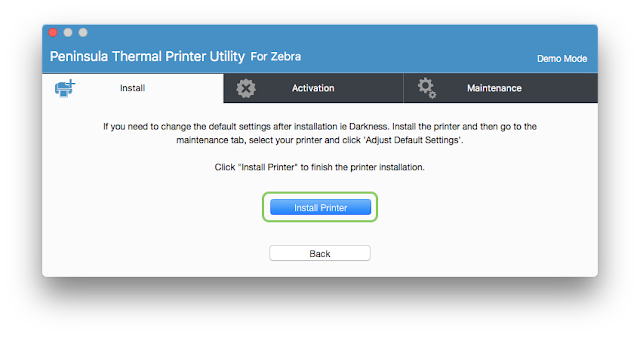
The next step is really easy, simply click on the "install printer" button and it will begin installing using the setup you have selected.
L)
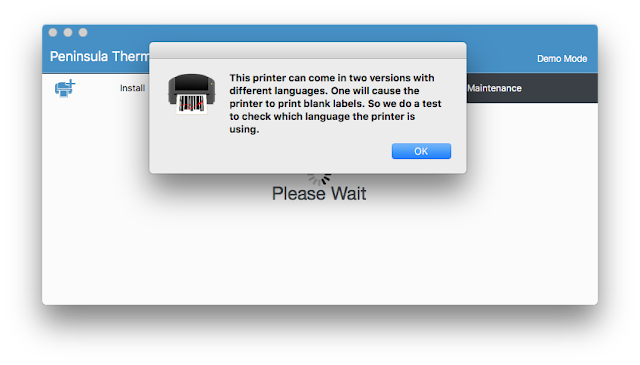
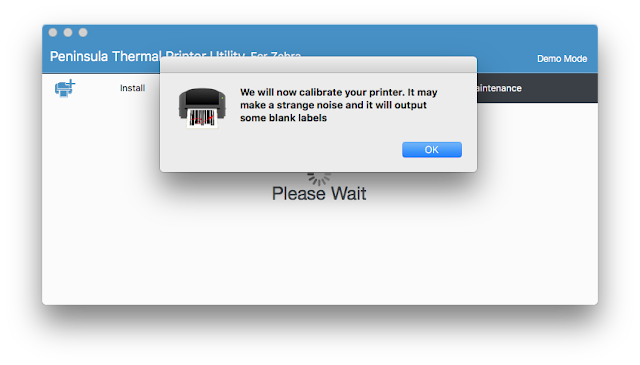
After clicking the previous "install printer" button this first dialog will pop up click "ok" and a second dialog will pop up saying we will calibrate the printer. Click "ok" and the installation process will continue. Listen for your printer to calibrate.
M)
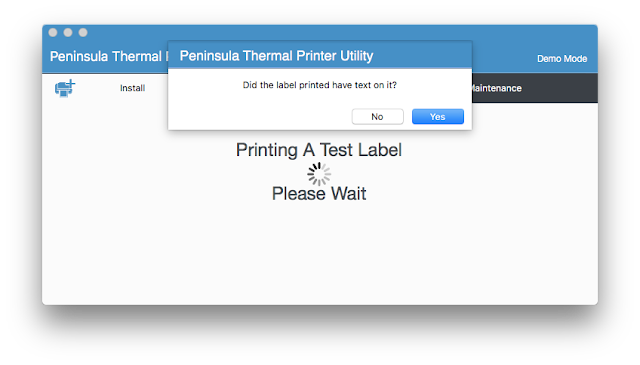 The next dialog to show will ask if a test label was printed, and did the test label have text on it. If your test label had text on it click "yes" to move onto the next step.
N)
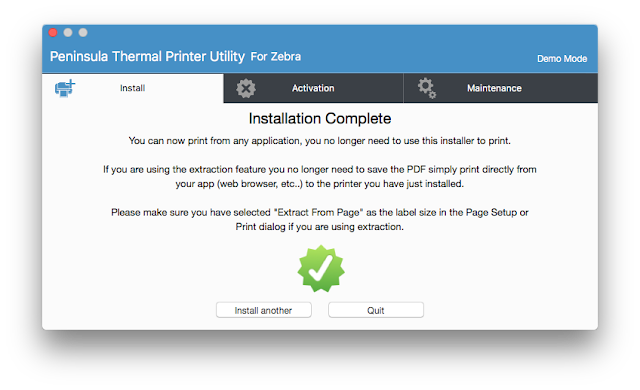
If the above dialog shows your installation is now complete, You can now print from any application.
If you encounter any problems with this setup or have any other questions or queries do not hesitate to contact out technical support team.
Email them at tech@peninsula-group.com
If you want to know more about the Thermal printer driver software check out the Peninsula product webpage.
https://www.peninsula-group.com/mac-thermal-printer-driver/
Begin by opening up the Zebra Thermal Printer Driver software. Upon opening it should look like the image above. Ensure you are in the Install tab.
To Begin the installation process simply click the "Next" Button.
B)

After clicking "next" the first page to show on the dialog will ask what connection your printer is using. In this setup we are showing you how to set up your USB connected Zebra label printer.
Therefore click the "USB connected printer" option from the drop down menu.
When the correct connection type is selected click "next" to continue onto the next step.
C)

The next step is to select the printer that you are using from the drop down list. As this is a Thermal utility for Zebra label printers you should have a Zebra label printer selected. Once you have ensured you have selected the correct Zebra label printer from the list click "next" to continue onto the next step.
D)

The next page will ask which printer model you are using. If you do not know which printer model you are using it will say somewhere on the printer itself, often at the front. For this example we used a ZP450 zebra label printer. Find your own printer model from the drop down list and select it. Ensure you have selected the correct model.
Then click "next" to continue.
E)

This step requires you to choose what sort of labels you will be using in your Zebra label printer. In our example we are using the Die cut standard labels, these labels are the most common labels to use in your Zebra thermal label printer. You will know what labels you use however so select the correct label and click "next" to continue.
F)

The next step asks you what you will be printing on the labels you print from your Zebra thermal label printer. Will you be printing simply barcodes and text or images with more than one colour. Most commonly you will be printing barcodes and text. In our example thats what we have selected to print from the Zebra label printer we are using. So select which option you are using and click "next" to continue.
G)

This step is asking for a name for your printer, this is so you know which printer it is and what setup you have installed it with on the thermal utility. Here we have simply named it the Zebra 450 as it is the name and model of printer we are using. You can choose to name your printer or leave it as the default name set. Remember to give your printer a sensible name but don't use any special characters. You might want to give this setup a different name as you can set up multiple virtual printer setups for different setups you may need it for. After you have typed a name or left it as default whichever you prefer, click "next" to continue.
H)

The next step is optional it is to type in a physical location for where your printer is stored for if you want one. This is an optional step and you don't need to enter a location name if you don't not wish to have one. For our example we have entered "office" as this is where we store the printer. If you choose to enter a location name ensure you enter it correctly and click "next" to continue.
I)

The next step is about the label/page sizes you will be using. You can add more than one size to the list, ensure you select the correct size labels that you will be using in your Zebra label printer. To add your label sizes, select which sizes you want from the list and click "add'. your label sizes should pop up in the left hand side box. the left hand size box shows which label sizes you have added.

To add a custom label size for if you don't see the label size you want in the drop down menu, simply click on the "add other size label" button. From there the dialog will change. The new dialog will look like the one in the image below. There are new text boxes prompting you to enter the dimensions you have for your own label sizes. Ensure you enter the correct dimensions and click the "add" button. Then When you have ensured you have added your correct label sizes click "next" to move onto the next step.

J)

The Next step in the installation process is to pick what application you are printing from, this is important so ensure you choose correctly. You should know what application you will be printing from but ensure you click the correct option. Click "next" to continue onto the next step.
K)

The next step is really easy, simply click on the "install printer" button and it will begin installing using the setup you have selected.
L)

After clicking the previous "install printer" button this first dialog will pop up click "ok" and a second dialog will pop up saying we will calibrate the printer. Click "ok" and the installation process will continue. Listen for your printer to calibrate.

M)
 The next dialog to show will ask if a test label was printed, and did the test label have text on it. If your test label had text on it click "yes" to move onto the next step.
N)

If the above dialog shows your installation is now complete, You can now print from any application.
If you encounter any problems with this setup or have any other questions or queries do not hesitate to contact out technical support team.
Email them at tech@peninsula-group.com
If you want to know more about the Thermal printer driver software check out the Peninsula product webpage.
https://www.peninsula-group.com/mac-thermal-printer-driver/


